Bottle Rocket[]
|
Bottle rockets describe any of a large variety of small scale skyrocket. The name derives from people launching them out of bottles and are usually attached to sticks for stabilization so they take a preplanned flight course. These small skyrockets have been made at least since the early decades of the 20th century in many countries including Japan, China, and the former colony of Portuguese Macao. The older type of bottle rocket was typically a black powder rocket with a motor about two inches (5 cm) long and up to 0.375 inch (9 mm) diameter, mounted on a thin bamboo splint and often having a small report charge. A later variant utilizes a whistling propellant pressed into a plastic tube. Some varieties have different effects, such ascending spark tails, colored tails, and even small star bursts. Many of these rockets are cheaply mass-produced and can be sold for a relatively low price, providing amusement to young boys and girls. Bottle rockets have been specifically banned in many places, even places which allow most other consumer fireworks, because of alleged degree of danger, particularly alleged fire hazard. |
Materials[]

Tools and casing

Nozzle mix, fuse, and Meal powder Casing NOTE: TWO FUNDAMENTALS OF THE ROCKET
Tools A rammer and a hammer are needed. Non sparking materials, such as aluminum, brass, rubber and wood should be used. Rockets can be made without the assistance of any specialized tooling however if you are serious and want 100% consistent results, rockets that fly faster, higher and are much easier to make it is strongly recommended. You will also need paper tape and a scoop for your various powders. Propellant Simpleblack powder (Meal - Black powder ) in the standard ratio (75:15:10) works well to propel the rocket. The Nozzle Black powder rockets require a nozzle . This is a plug in the exhaust end of the rocket, with a small opening. Nozzles for fireworks rockets are usually made with clay. Bentonite and kaolin clay work well. The dry clay powder is rammed into the casing, producing a solid plug. Cheap kitty litter is often made of bentonite clay and may be used instead. Grind up the kitty litter into a fine powder, which is most easily done with a ball mill or coffee grinder. This powder can be used to produce rock-hard nozzles that erode very little. |
Construction[]

Tools and nozzle mix Place the casing on to the aluminum base. If you don't have a base temporarily seal one end of the casing with a bit of paper tape. Take a small amount of nozzle mix and dump this into the casing, tapping it to settle the powder. The aim is to approximately make the nozzle the same thickness of the casings inner diameter. This can be a little tricky and is an important step in building your black powder rocket. A nozzle that is too thin will not be able to withstand the inner pressure and blow off. Make your nozzle too thick and it will affect the rockets performance. To be consistent make some tooling like a powder scoop to measure the exact amount every time that way you ware guaranteed accurate results. |

Ramming the nozzle Insert the ram into the inner casing and gently ram it with your hammer. You don't need to use a huge amount of force to achieve a rock hard nozzle. Exerting too much force will split you casing or cause a very small fracture, which under pressure can cause your rocket to CATO . Later we will discus how to fine-tune your rocket by adjusting your nozzle throat size and mandrel. |

Next you need to add the meal powder in small increments (as always, no more at a time than will give a layer after ramming as thick as the casings inner diameter). As with the nozzle, using a powder scoop for adding the meal powder can help produce consistent results at this point. If you add too much meal powder you can create small air pockets in the composition and this will affect the performance of your rocket. |

Ramming the end plug Finally, ram a layer of clay again to form an end plug. The end plug of the rocket in the example is about 5mm thick, slightly less than the casings inner diameter. If you wish to add a payload to your rocket leave one or two millimeters of the casing unfilled. This will hold the priming for the effect charge. |

Next you need to remove your rocket from the aluminum base. If you do not have a base and have covered the end of the rocket with paper tape then remove the paper tape from the end of the rocket and proceed to drill the hole in the nozzle. Depending on the quality of meal powder a 2.5 mm hole should be sufficient. Take care to center the hole well. To increase the surface area of black powder available initially, a mandrel (core) is drilled into the propellant as well. How to fine-tune your nozzle and mandrel is discussed later. In the example, the hole was drilled 3/4 into the propellant grain.  |
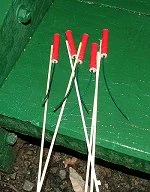
| Tools and finished bottle rocketAll that remains is a fuse to light and a stick to stabilize the rocket. Use a straight stick for this (see rocket stabilization below). It can be attached with hot glue or paper tape. A sufficiently long (don't economize on fuse!) length of fuse is inserted into the nozzle and core of the rocket, as far as it goes. Black match or visco fuse may be used. The fuse may be bent over and held in place with paper tape on the side of the rocket. This way of fusing allows you to light the rocket without having to hold a flame directly under the nozzle of the rocket. Remember, never stand over the rocket when lighting. |
Fine tuning your rocket nozzle[]
The nozzle throat size and mandrel greatly affect the performance of your rocket and in small rockets this can only be found by trial and error. The quality of your black powder also has an enormous impact on nozzle and mandrel design. Some powders have a very fast burn rate creating more pressure quicker requiring a larger nozzle opening and some powders have a slower burn rate requiring a smaller opening. A deeper mandrel will also generate more thrust as this creates a larger surface area for the burn resulting in more powder being burnt at ignition time. Too deep, and the rocket will explode on the launch pad, too shallow and take-off will be very slow which will not allow the rocket to reach a proper altitude (having burnt most of its propellant even before it gains sufficient thrust to take off). So as you can see there are many factors that will affect the performance of your rocket, just keep experimenting and eventually your rocket will fly fast and high.
Rocket Stabilization[]
Now that you have built your rocket, it needs to be stabilized during it's flight time (in other words it needs to fly vertically). This control of your rocket is essential, not only for the safety of you or your audience but for your satisfaction. Especially if you have a payload attached, this needs to explode high in the sky and not on or near ground level. At all times we want to avoid injury or possibly starting a fire.
Stabilizing your rocket is relatively a simple process as long as you follow these rules. Your stick needs to be straight and it needs to be long and heavy enough to pass the balance test. This test is simple, attach a stick to the side of your finished rocket and try and balance your rocket on your finger. Do this by placing your finger just behind the exhaust nozzle. If the rocket topples forward, then your stick is not long or heavy enough and may cause it to fly in unpredictable directions. If it topples backwards then your stick is too long or heavy and will make your rocket sluggish and reduce it's apogee. If it's too long simply trim a small amount off and do the test again. If it's not long or heavy enough replace the stick with a larger one. Also, if you have for example 2 sticks, which both pass through the balance test, but one is longer and lighter and the other one is shorter and heavier, it's the best to pick the longer lighter stick, so that you rocket will fly better.
Basically the end result you are after is a rocket and stick that balance nicely on your finger when it is placed behind the nozzle. It's a simple process that will ensure your rocket will fly straight into the night sky and join the stars.
Adding A Payload To Your Rocket[]
Drill a small hole--2mm works well--into the rocket's end plug and just barely into the propellant. As the rocket consumes the last of its fuel, the propellant will ignite the effect charge through this hole. The high pressure inside the casing will push hot gas and sparks through this hole and so its best made near the side of the casing. The hole should not be set in the center because the flame front propagating through the propellant grain will reach this point first.
The fire transfer hole in the end plug is primed with a bit of loose black powder, and the shell is attached to the casing with tape or hot glue. The time fuse of the shell must be adjusted for this purpose. Normally, the fuse of shells is long enough to allow the shell to reach maximum altitude when shot from a mortar . When used as a heading for a rocket as shown here, we would like the shell to explode virtually immediately when ignited since the rocket itself already provides the delay. A small amount of visco can be used, with 5mm giving a delay of less than half a second